


Simple Spring Data Example
March 26, 2012 by Vinicius Isola
As my first post I’m going to do a very simple command line application that manages one entity called Person. The purpose of this example is to demonstrate how powerful the new Spring Data projects family are.
Spring Data
Spring Data is a family of projects that aims to create a repository layer. The idea is to have an abstract layer were all the dependencies will point to and different implementations with all kinds of data repositories (SQL and NoSQL), similiar to what JDBC did for SQL databases. So what you’ll see when you go to Spring Data project page is one common project that has a bunch of interfaces and helper classes to deal with the abstraction of a repository - and here is where your dependencies should end. And then, a few other projects that implement this abstract layer for a specific data repository. Some examples are: JPA, Hadoop, etc.
A basic image of how the layers would be for the JPA Repository is this:

The Example
This example was meant to be as simple as possible. I’m using spring data to provide the functionality required for a basic CRUD application using the JPA repository implementation. One thing worth noting is that though Spring Data will automatically do all the repository management for you, it’s still necessary to map your entities. It is also necessary to setup your datasource and entity manager factory.
To avoid distractions, it will be just a command line application. The full source code can be found in the blog repository in github.
So let’s start by a basic step-by-step on what you need to setup to make everything work.
Step 1 - Create a DataSource
The simplest way to manage a DataSource is to let Spring do it for you. The following bean declaration uses Apache Commons DBCP connection pool to create a basic DataSource. This goes inside Spring configuration file (/META-INF/spring/config.xml for this application).
<bean id="dataSource" class="org.apache.commons.dbcp.BasicDataSource" destroy-method="close">
	<property name="driverClassName" value="org.h2.Driver" />
	<property name="url" value="jdbc:h2:~/databases/person" />
	<property name="username" value="sa" />
	<property name="password" value="sa" />
</bean>
This DataSource is using an embedded H2 database that is going to be created automatically inside the user directory inside a databases folder.
Step 2 - Create your entity
I created one basic Person entity with a few properties and one named query that will be used to find a person by name (first or last). Setting first and last name to lower case inside the query will help make the query case insensitive (and slower if performance is an issue for you).
package bearprogrammer.blog.springdata.model;

// imports here

@Entity
@NamedQuery(
		name="Person.findByName",
		query="select p from Person p where lower(p.firstName) like ?1 or lower(p.lastName) like ?1")
public class Person {

	@Id
	@GeneratedValue
	private Integer id;
	private String firstName;
	private String lastName;
	private String email;
	private Calendar birthday;

	// Getters and Setters

}
Step 3 - Create your EntityManagerFactory
I’ll use Spring’s [LocalContainerEntityManagerFactoryBean](http://static.springsource.org/spring/docs/3.1.x/javadoc-api/org/springframework/orm/jpa/LocalContainerEntityManagerFactoryBean.html . This is a FactoryBean that generates EntityManagerFactory with specific configuration, avoiding any extra files to setup your persistence layer. That means we won’t need a persistence.xml nor any other mapping files.
Inside Spring configuration file I added the following:
<bean id="emf" class="org.springframework.orm.jpa.LocalContainerEntityManagerFactoryBean">
	<property name="dataSource" ref="dataSource" />
	<property name="packagesToScan" value="bearprogrammer.blog.springdata.model" />
	<property name="persistenceProvider">
		<bean class="org.hibernate.ejb.HibernatePersistence" />
	</property>
	<property name="jpaProperties">
		<map>
			<entry key="hibernate.dialect" value="org.hibernate.dialect.H2Dialect" />
			<entry key="hibernate.hbm2ddl.auto" value="update" />
		</map>
	</property>
</bean>
All the JPA configuration happens in this bean declaration. The first property set where it will find the DataSource. That’s the bean we declared on step 1. The second property, packagesToScan, set a list of packages that will be scanned for entities, in this case, I’m setting only one, the one I put my entity in on step 2. The third property is the persistence provider, in this case, I’m using Hibernate’s provider.
The forth property is a map that will be passed to the provider for configuration. The first entry in the map is Hibernate’s dialect, that’s the one for H2 databases. The second entry requests Hibernate to update the database schema to match what’s being mapped in the entities. If the schema doesn’t exist, it will be created.
Step 4 - Create your repository interface
Spring Data will use your repository interface to manage all interaction with the underlying data repository (JPA in this example). In most cases, you won’t need to implement any code, just use whatever Spring Data’s implementation is given to you. The following is mine interface:
package bearprogrammer.blog.springdata.model;

import java.util.List;
import org.springframework.data.repository.PagingAndSortingRepository;

public interface PersonRepository extends PagingAndSortingRepository {

	public List findByName(String name);

}
It has only one method declared and all others will be inherited from Spring Data’s abstract repository interface.
Now that we have the repository interface, lets go to the last step:
Step 5 - Declare the repositories
Spring Data JPA provides a specific namespace that contains one tag-do-all that will create the repository implementation for you. It’s as simple as:
<jpa:repositories base-package="bearprogrammer.blog.springdata.model" />
The only thing you need to do is say what package your repository is in and it’s done. The package - and subpackages - will be scanned for interfaces that extends Repository and an implementation will be provided to you. If you don’t specify the name of the bean, the name of the interface will be used. For example, the interface PersonRepository will create a bean named ‘personRepository’ in the application context.
Detailed Explanation
When you declare methods in your repository interface, a query will be created automatically if you follow the pattern given by them - all the patterns can be found here. If you don’t follow the pattern, like I didn’t (because my entity doesn’t have a property called ‘name’), it will try to map to a named query first. In this case, that will work because I have a named query that maps to my method name (my named query has the name ‘Person.findByName’ and my ‘*Person*Repository’ has a declared method ‘findByName’). If I didn’t have the named query, an exception would be generated saying that the entity Person doesn’t have a property called ‘name’.
The following is an image that represts what’s going on:
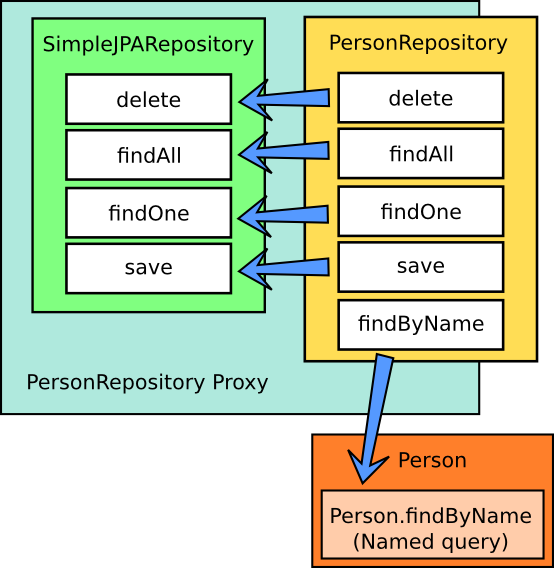
Spring data will create a proxy that implements my ‘PersonRepository’. So for everyone that receives the bean created for the specific repository, it will be an implementation of that interface. It can also be autowired by type or name.