


What is and how to use @ModelAttribute
April 11, 2012 by Vinicius Isola
You can get the code for this post in the blog repository in github.
Spring MVC is one of the easiest and most powerful MVC framework to build web applications in Java. With all the features that it has available it is impossible to know everything. But in most cases, when you ask the question: “Can Spring MVC do [put something complex and unexpected here]?” the answer is yes. And when it can’t, the answer is: it has a place for you to hook your code in and do whatever you need.
Recently, having a conversation with one of my friends that is using Spring MVC and Spring Data in a new project for the company he works, he stumbled into the @ModelAttribute annotation and asked me if I knew how to use it. My answer was that I’ve never heard about it before but I was going to take a look into it. What I found was a solution to an old problem that I had but I’ve never thought that Spring MVC would have a solution for it.
The problem I faced in a recent application I worked on was that I had a relatively large entity with a few sub-entities in it. When I build the form in the JSP page to send to server, I had to put in the form all kinds of information in hidden fields so that my entity didn’t get updated by mistake with a null value (like a created or last updated field). And I still needed to do more because I had all those sub-entities that needed to be loaded and correctly filled (or put all fields in the form, even those I wouldn’t need in the page). The result was a large HTML with unnecessary data being passed around and unnecessary complex code in the controller to process all those details.
The @ModelAttribute exist to solve this kind of problem. The way it works is that you can annotate one (or more) of the methods in your controller as a model attribute, meaning that it will contribute some attribute to the model. In this post I’m going to show how to use it and what are the details associated with it.
This Example
A simple web application using Spring MVC and Spring Data (you can check my tutorial for using Spring Data here). I used Spring Data to create a Person repository. A person is a simple entity that contains just four properties: firstName, lastName, id and created. How to manage that is out of the scope of this tutorial so I’ll move forward for the model attribute part.
I have only one controller in this application. The controller uses the PersonRepository to load and save people in the database.
Step 1 - Create your controller
The controller is a normal POJO with one special Spring annotation: @Controller.
@Controller
public class PersonController {

	// The repository is being injected using autowired
	@Autowired
	private PersonRepository personRepository;
To make that work, you need to setup the Spring MVC (also out-of-scope for this tutorial but you can read more about it here). In the servlet configuration add the component-scan tag so that Spring can search for your controller in the correct package:
<context:component-scan base-package="com.bearprogrammer.blog.modelattribute.controller" />
Step 2 - Create the @ModelAttribute method
In this example the Person entity doesn’t have any sub-entities but it has a created field that we don’t want to update every time the entity is saved. It only needs to be generated the first time and never change again. We also don’t want to pass that to our JSPs.
So we create a getPerson method that will load the entity if the personId parameter is passed in. We annotate it with the @ModelAttribute annotation so that Spring knows what we are doing. The following is the source for the method:
@ModelAttribute
public Model getPerson(Integer personId, Model model) {
	System.out.println(">> getPerson");

	if (personId != null) {
		model.addAttribute("person", personRepository.findOne(personId));
		System.out.println(">> Person loaded");
	}

	return model;
}
This method also receives the Model object, that is the Spring Model for this request. This model is just a map that contains all objects that will be passed to the view (JSP page). The method signature is as flexible as action methods in the controller. So Spring knows that you want the Model object and will pass it to you.
This method will be called every time a request is mapped to one of the actions in this controller. That means that it must be fast, simple and generic.
Step 3 - Write all other action methods
The controller have three action methods (methods that maps to requests). One that returns the list of all people, one that is used to edit an existing person or to create a new person and the last one that saves the person in the database. Following you can see the code for all three:
@RequestMapping("/all")
public Model all(Model model) {
	System.out.println(">> all");
	model.addAttribute("personList", personRepository.findAll());
	return model;
}

@RequestMapping("/edit")
public Person edit(Person person) {
	System.out.println(">> edit");
	return person;
}

@RequestMapping("/save")
public String save(Person person) {
	System.out.println(">> save");

	System.out.println("\t>> created is: " + person.getCreated());
	if (person.getCreated() == null) {
		person.setCreated(Calendar.getInstance());
	}

	personRepository.save(person);
	return "redirect:all.do";
}
You can see that I added a System.out.println to each one of them so we can track what’s going on. The save method receives a Person instance. Spring will search for objects in the Model to fill that argument. In this case, it will be the person that was retrieved in the getPerson method.
The edit method doesn’t do anything, just return the person it received from the getPerson method. That object will be in the request, as an attribute, available to the view. Following you can see a piece of the JSP that uses the person, if available:
<form action="save.do" method="post">
	<input type="hidden" name="personId" value="${person.id}" />

	<label for="firstName">First name:</label>
	<input name="firstName" value="${person.firstName}" />
	<br />

	<label for="lastName">Last name:</label>
	<input name="lastName" value="${person.lastName}" />
	<br />

	<c:if test="${person.created != null}">
		Created:
		<fmt:formatDate value="${person.created.time}" pattern="yyyy-MM-dd HH:mm:ss.SSS" />
		<br />
	</c:if>

	<input type="submit" value="Save" />
</form>
The same page is used to add a new person and to edit an existing one. To create a new person, we just need to call the edit action without the personId.
How does it work
If you execute the application and check the application server logs, you’ll see the following when going to all.do:
>> getPerson
>> all
You can see that getPerson was called but it didn’t load any record because it didn’t receive a personId (unless you pass that as parameter, normally we wouldn’t want to do that).
If you click in the New Person link you’ll be redirected to edit.do passing no personId. That means that no person will be loaded and you’ll see the following in the log:
>> getPerson
>> edit
Filling the form and saving a new person will show the following in the log:
>> getPerson
>> save
  >> created is: null
>> getPerson
>> all
You can see that the person was not loaded, but it was saved and created was null. You can also see that there’s no save.jsp, the save method is just redirecting to the all.do that’s why there a new call to the getPerson and all method.
The most important part and reason of all this is when you click in the link of the name of a person in the all page. Just save the person (or change something if you will). Saving it will show the following in the logs (from where you clicked on the edit to the redirect to the all):
>> getPerson
>> Person loaded
>> edit
>> getPerson
>> Person loaded
>> save
  >>created is: java.util.GregorianCalendar[time=1333675805450,areFieldsSet=true,areAllFieldsSet=true,...
>> getPerson
>> all
You can see that in this case the person was loaded in both cases: edit and save. The edit loaded it to show it in the jsp page. The save loaded it so it will not overwrite the created date for the person.
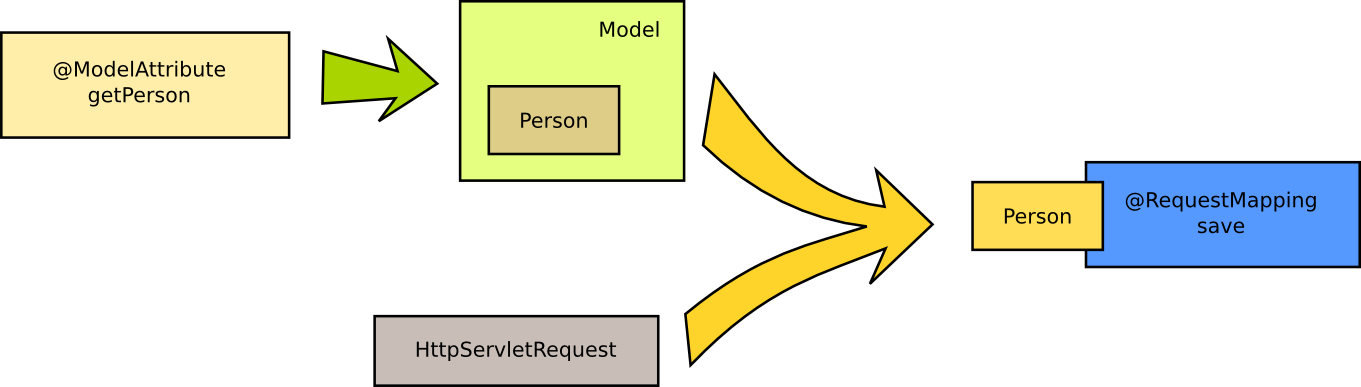
What happened
Spring is going to call your @ModelAttribute method and merge the model and all objects that are in it with whatever comes from the request. The following is an image that shows that: