


Bean Validation (JSR-303) and Spring MVC
April 14, 2012 by Vinicius Isola
The code for this example can be found at the blog repository in github.
Validation in web applications normally spread through many lines of code in the client side and in the server side. JSR-303, or Bean Validation, is a standard developed to be part of JPA. It’s a simple and generic way to annotate your entities with specific validation rules and have them validated by some validation engine.
Hibernate started with validation through annotations and JSR-303 was highly influenced by it (probably completely driven by it). Part of JEE 6, for those who are not using a complete JEE server (like Tomcat), the API can be found in one of Hibernate’s artifact:
<dependency>
	<groupId>org.hibernate</groupId>
	<artifactId>hibernate-validator</artifactId>
	<version>4.2.0.Final</version>
</dependency>
Spring MVC 3 added full support for validation using JSR-303. So the same validation that you use in the persistence layer can also be used in your web layer, at least in the server side. This example will show a simple application that uses Bean Validation to validate a bean before saving it.
The Example
This simple example does not use a persistence layer. All beans are stored in a TreeMap inside the controller. Only two JSP files are used, one to show all beans in memory and one that is used to edit an existing bean and also to create new ones.
The validation occurs inside the controller and it’s done automatically by Spring. The controller only checks if there are errors and redirect the user accordingly.
The edit.jsp page will show the validation errors in a list, so the user can act and try to resend the form again.
Step 1 - Add the validation
First thing you need to do is annotate your bean with the correct constraints. The following is the Person class code with the annotations:
public class Person {

	// This is going to be generated on the server-side
	private Integer id;

	@NotNull
	@Past
	private Date birthday;

	@NotNull
	@Size(min = 1, max = 50)
	private String firstName;

	@NotNull
	@Size(min = 1, max = 50)
	private String lastName;

	// Getters and Setters

}
In most cases the constraint annotations are very explicit and self-explanatory. You can find the documentation in JEE 6 API, inside package javax.validation.
Step 2 - Ask Spring to search for annotations
Spring needs to know that you want to use JSR-303 validation. To do that, you need to add the following code to your Spring configuration file:
<mvc:annotation-driven />
Step 3 - Set the bean to be validated and handle validation
You need to ask the controller to validate your bean using the @Valid annotation. You also need to get the BindingResult through the action parameter. If you don’t set the BindingResult as a parameter, Spring will throw the exception and never call the controller method. The BindingResult object gives you the power to decide what to do if there were binding errors.
Important! As soon as you put BindingResult as a parameter in your controller method, all validation is now your responsibility. Spring will validate and put all errors inside the result. It will assume that you are going to handle everything in the controller method that received the result.
The following is the save method (that doesn’t save, just add the bean to the TreeMap):
@RequestMapping("/save")
public ModelAndView save(@Valid Person person, BindingResult bindingResults) {

	ModelAndView mv = new ModelAndView("redirect:all.do");

	// Check for validation errors
	if (bindingResults.hasErrors()) {
		mv.setViewName("edit");

		mv.addObject("person", person);

		// Add errors to the Model so that they can be used in the view
		mv.addObject("errors", bindingResults.getFieldErrors());

		// Print the errors to the console
		System.out.println("Validation errors:");
		for (FieldError error : bindingResults.getFieldErrors()) {
			System.out.println(error.getField() + " - " + error.getDefaultMessage());
		}
	} else {
		if (person.getId() == null) {
			// Generate ID
			person.setId(people.size() + 1);
		}
		people.put(person.getId(), person);

		System.out.println("Person saved!");
	}
	return mv;
}
Step 4 - Show the errors to the user
The easiest way to show the errors to the user is to loop through all of them and print it in the edit.jsp, where the form is. That way the user can try to fix whatever was wrong and submit the form again. The following is the code for the edit.jsp page:
<%@ page language="java" contentType="text/html; charset=UTF-8" pageEncoding="UTF-8"%>
<%@ taglib uri="http://java.sun.com/jsp/jstl/core" prefix="c" %>
<%@ taglib uri="http://java.sun.com/jsp/jstl/fmt" prefix="fmt" %>
<!DOCTYPE html PUBLIC "-//W3C//DTD HTML 4.01 Transitional//EN" "http://www.w3.org/TR/html4/loose.dtd">
<html>
<head>
	<meta http-equiv="Content-Type" content="text/html; charset=UTF-8">
	<title>Edit Person</title>
	<style>
		#errors {
			color: red;
		}
	</style>
</head>
<body>
	<c:if test="${errors != null}">
		<ul id="errors">
			<c:forEach items="${errors}" var="error">
				<li>${error.field}: ${error.defaultMessage}</li>
			</c:forEach>
		</ul>
	</c:if>

	<form action="save.do" method="post">
		<input type="hidden" name="id" value="${person.id}" />

		<label for="firstName">First name:</label>
		<input name="firstName" value="${person.firstName}" />
		<br />

		<label for="lastName">Last name:</label>
		<input name="lastName" value="${person.lastName}" />
		<br />

		<label for="birthday">Birthday:</label>
		<input name="birthday" value="<fmt:formatDate pattern="yyyy-MM-dd" value="${person.birthday}"/>" />
		<br />

		<input type="submit" />
	</form>
</body>
</html>
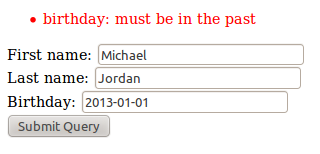
Result
If you go to the edit page and try to save a person with a date in the future, you would see the following error: