


Testing a web application with Gretty, Cucumber and Selenium
September 3, 2014 by Vinicius Isola
The code used in this post is a complete web application built with Spring WebMVC, Spring Data and Spring Security. It contains a lot more than what is explained here and I hope to come back to it in later posts. The code can be found in my Github repository.
For this post I’ll be focusing on how you can test a web application using Cucumber and Selenium. I’ll be using the Gretty plugin to start a web container during the build. I’ve picked this plugin because of the built-in setup for integration tests.
Documenting code with test
Documenting software is a task getting harder and harder as development becomes more and more agile. From what I’ve seen in the companies I’ve worked with lately it feels like documenting code is becoming old fashion and considered part of old waterfall-like methodologies. The new preference (at least what everybody says they do) is that automated tests document the code. The thinking is that if the test is passing, the code is right and if you read the test you’ll understand what the code does. That is if the tests (and the code) are readable.
Some frameworks like Cucumber and Robot are examples that can help you merge test automation and documentation. The idea behind these frameworks is that you’ll have some text written in plain english (or whatever language you prefer) and each statement matches a function that get’s called and possibly receives parameters from the statement. Both these frameworks are very flexible and my preference for Cucumber lately has to do with the fact that it has a port to Java so it can easily integrate with Java code, JUnit and dependency injection frameworks like Spring.
Cucumber focus on user stories and test cases. So you write your feature file (describing the feature that’s going to be tested) starting with the user story and then all the scenarios that you expect for the feature. You use a language called Gherkin which has an editor for Eclipse. This is how it looks like:
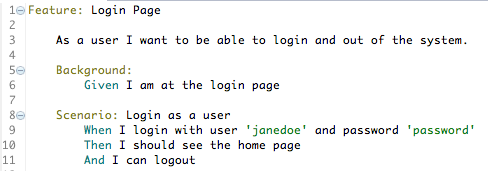
This content is from a feature file from the application, which means this is actually a test that will be executed as part of the build. I know it’s a dream that will never com true to have business people writing these but at least they could read it. Which means that as part of the early phase of your development process you could start writing these (the user story and some initial scenarios) in a room with the business people and as part of your build you could deliver a report showing which ones passed. When they are all green, your feature is implemented and ready for the next phase (QA or whatever that would be). This methodology actually has a name: Acceptance Test Driven Development.
Integration Test with Cucumber
Cucumber JVM is a Jar file that contains a main class which can be run like any other Java command. To run it from Gradle I set up a task which I called integrationTest of type JavaExec and passed all the parameters expected.
Before running this class we need to make sure that the glue code and all its dependencies are compiled and ready. For that I created two configurations: integrationTestCompile and integrationTestRuntime. These extend from functionalTestCompile and functionTestRuntime respectively, which extends from testCompile and testRuntime, meaning that if you use JUnit for your unit tests, you won’t have to add the dependency again for functional nor integration tests, since they will inherit it. I also added one source set called integrationTest which will expect (by convention) your integration test classes to be in the src/integrationTest/java folder and your resources to be in the src/integrationTest/resources folder.
With these two things in place (the configurations and the source sets) the Java plugin will add the following tasks to your build automatically: compileIntegrationTestJava, processIntegrationTestResources and integrationTestClasses (which depends on the first two). This means that we don’t have to write our own compile and process resources tasks. But we need to add them as a dependency to our integrationTest task.
The important parts of the task are the following:
task integrationTest (type:JavaExec, dependsOn:integrationTestClasses) {
    check.dependsOn it
    args = ['--strict', '-f', "html:${buildDir}/reports/tests/integration", '--glue', 'com.bearprogrammer.blog.sample.integrationTest.glue', 'src/integrationTest/features']
    classpath = project.sourceSets.integrationTest.runtimeClasspath
    // omitted
    main = 'cucumber.api.cli.Main'
    mustRunAfter functionalTest // We don't want to run integration tests if functional test haven't past
    inputs.files fileTree(dir:'src/integrationTest/features',include:'**/*.feature')
    outputs.files "${buildDir}/reports/tests/integration"
    // omitted
}
Line 2 will add this task as dependency for check, which is part of the build. So when you run gradle build it will run all tests, including the integration tests.
Line 3 sets the arguments that are passed to Cucumber, which are the strict flag, to make the command fail if a step is not yet defined. The f argument, which sets the format for the report (next argument also). The glue argument to set the package to scan for glue code. The last argument is the path where to find feature files, which should go into the src/integrationTest/features folder.
Line 4 sets the classpath to be the ones coming from the integration test source set.
Line 6 points to Cucumber main class.
Line 7 makes this test always run after functional tests, which in turn will always run after unit tests. This way you’ll fail your build fast instead of running all integration tests just to find out that you have one unit test that doesn’t pass.
Lines 8 and 9 set the input and output for this task. This will help Gradle to be smarter and not run the task again if nothing relevant changed. (Gretty will still start and stop the web server.)
Extra Selenium Arguments
In the last few lines of the integrationTest task you see some if statements. Those are setting up some options that will be picked up by the Selenium driver configuration and listeners. There are three extra options:
- webdriver - This option let you pick what web driver you want to use. The default is HTMLUnit but you can pass any of the other two: Firefox and Chrome. Internet Explorer web driver has a different package name so the code won’t work but can be easily adapted. If you want to use Chrome web driver there is some setup that needs to be done.
- seleniumInterval - The amount of milliseconds to make Selenium wait after each action. This is good when you want to see what’s happening in a test or if you’re trying to reduce the number of intermittent test failures because of timing with Selenium.
- seleniumScreenshots - Boolean that when set to
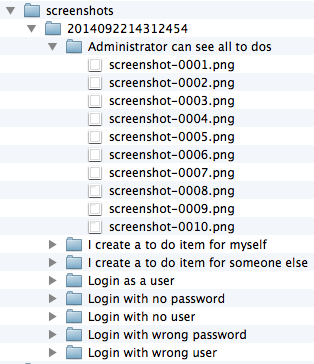
truewill take a screenshot after every action, if the web driver implements TakesScreenshot. HTMLUnit web driver does not, so if you want to use this feature you’ll have to use Firefox or Chrome. Screenshots will be stored in thebuild/screenshots/${timestamp}/${scenario name}directory.
To set any of these options you use the -P flag of Gradle like the following:
$ gradle integrationTest -PseleniumScreenshots=TRUE -Pwebdriver=Chrome -PseleniumInterval=250
Which would activate screenshot taking, add an interval of 250ms after each action and use the Chrome driver. If you go into the build/screenshots folder you’ll see something like the following: